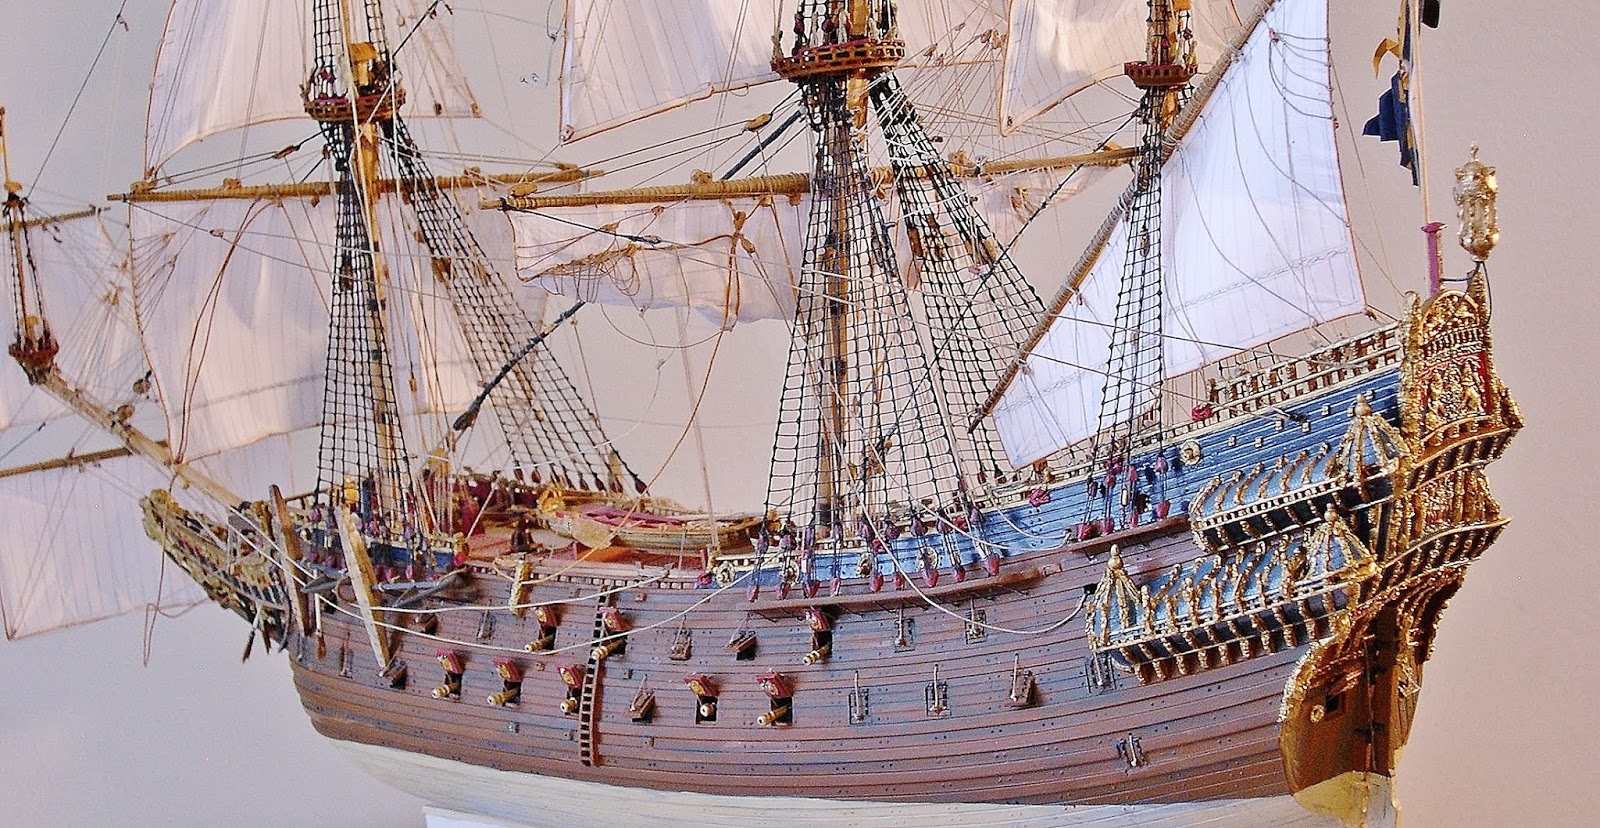
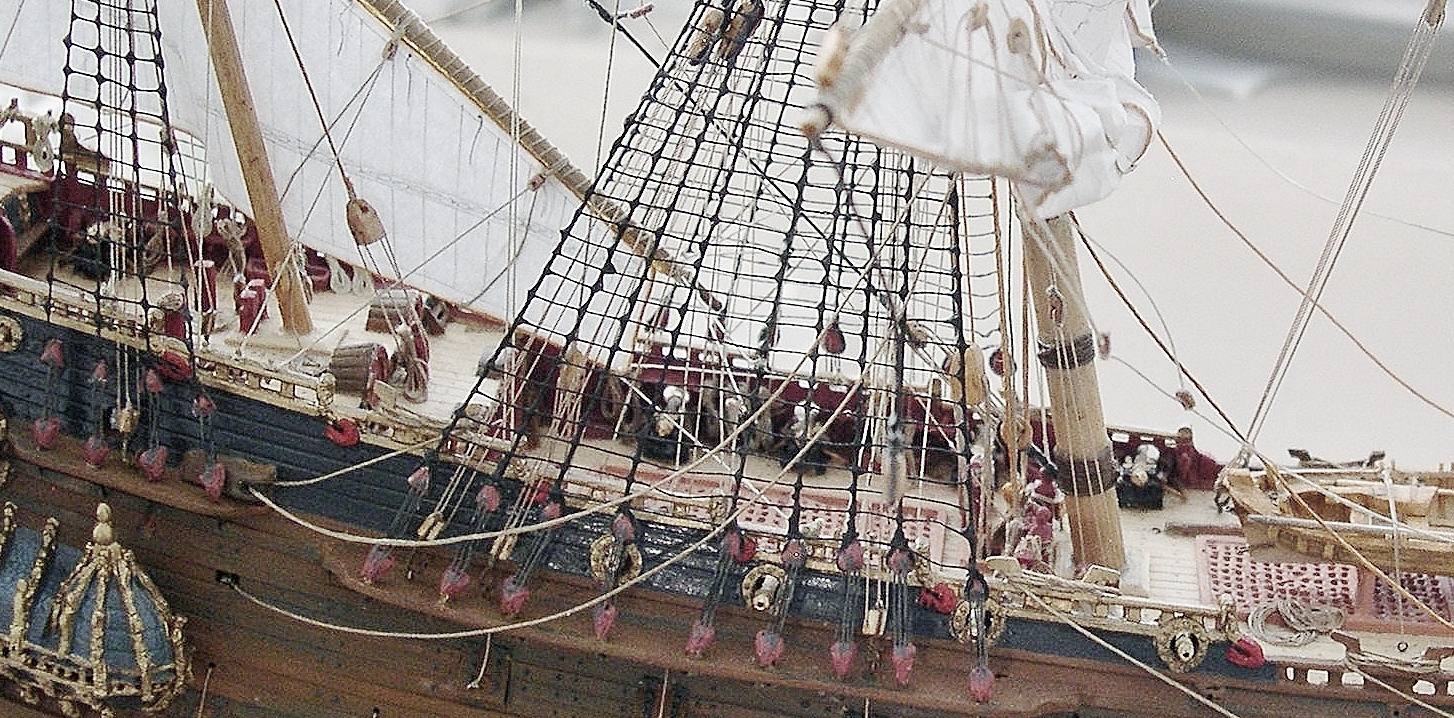
Friday, February 19, 2021

H.M.S. Prince c.1670 -The Art Of Modification...Part Two


 As I sit here writing I can't help but to think how interesting my childhood was. I was adventurous and explorative. Always wanting to learn -whether from the classroom, the diverse community, or television. But the foundation of it all were my parents; primarily, my mother. In her was this immense wisdom that I later found in most women -and that ultimately put me over the top as a man, artist-craftsman, and father.

As such, I embraced history with an open mind -pushing away biases that was the pitfall to limited thinking. Instead, I absorbed every aspect of my profession down to the smallest details and embraced many, many cultures that helped it along...because in those cultures were missing pieces that made up what is viewed above -beauty.

In my early post on this subject I wrote about technique and staying in one's own lane. This principle I will continue to hammer home so that it will become evident (and fact) that we ALL have a purpose through the things we live and experience.

In the above image is the next stage is applied relative to taking plastic and simulating it to appear as wood. Yet, there are wood components in certain areas of the build.Al 


In this photo, natural wood components are seen -such as the interior deck props. These were fit in various locations to take on the wood cannons I made for the open gun ports. But prior to this I had to evaluate certain details and relocate them to their proper areas such as the deck furniture and bulkheads. The kit, though finely made, had issues which was unavoidable such as warping and mast displacement. Other factors included the bulkhead details such as adding to the carved pieces, removing windows and doors; and, substituting actual wood decks to take the eyebolts.  

The deadeye channels were no exception, they were completely replaced and knees which I hadn't  seen in any models. Knees were essential for strengthening the channels and lightening the stress when taking on the shrouds. At the fore channel such strengthening was mandatory when carrying the large stowed anchors.

Another missing element that I considered were the skids and/or fenders that were located amidship which ran down the side of the hull to the last wale at the waterline. These were very much part of the naval design -not just for British ships but for most seafaring nations. These skids and/or fenders prevented the boats from damaging the hull when being hoisted from and lowered into the water.


A closeup image showing the much notable skids/fenders. Also, notice the trunnels and planking about the topsides. This was done with a special pencil -one of the primary tools I use for both my models and dioramas. Every artistan have their arsenal of special tools needed to fit their line of work; and no two artists are alike because each use their tool(s) that are comfortable for his or her purpose. This is what makes work(s) 'original' and not a 'hard copy'. I encourage every novice artist/builder to explore materials and use them faithfully...because at the end of the day, the result will be yours. That advice you can take to the bank.

Research is beneficial at any level. The more study placed in a thing, expect better results!

I have invested countless hours in what I do and seldom keep logs. This current project is no exception. 

Usually I take my time (days or weeks) to scrutinize certain parts of the build before moving on to other areas. I will study other areas in preparation, but will refrain from touching anything until that particular space is finished -leaving no options to rework. This approach eliminate frustrations in the long run.

With the outside of the hull finished, I move on to the galleries. The windows would usually take a back seat until the lanterns are addressed...and yet, there are times when I would ignore the windows and move on to the interior work -such as the deck and cannons. The below images show the finished galleries.


The paints applied to this (and all my creations) are not straight from the jar; they are custom-mixed. Even the gold are applied in several variations -and gold leafed in certain areas for highlight. This process can take several weeks through experimentation.

To add better detail to gunports I work the lid ropes as shown in the following three images...


Next are the cannons which had to be scaled properly. The kit provided pieces that did not fit the overall appearance of the model. So, by trial and error, I made them from wood and secured them to wood platforms. This was followed by installing decks to cover the cannons and working up a template to make bulkheads and supporting deck furniture align correctly. Another set of photos support this below.


Viewing the image, the carriages and cannons are mounted below decks and the main deck is prefit to duplicate in wood. Also the plastic cannon/carriage are assessed to evaluate whether or not scaling is needed. The following photo show the conversion from plastic to wood on the quarter deck...


On this deck I relocated the grating as it is too close to the mizzen mast/slot. I noticed on various Prince models, this grating was omitted. It was inevitable to have these for dispersing smoke during cannon discharge.-especially since there were ten cannons within that enclosure.


In this image the main deck was also revised. It was here where I realized the scale of the guns were off relative to them clearing the bulwarks when being run in. Also the grating had to be slightly widened to support the boats without compromising the cannon. There was no room to place the grating that was supposedly behind the mainmast. In the plan drawn by noted British engineer Percival Marshall, no grating is shown.


Here is the scaled template I drafted to use throughout the build. The small markings on the side is the spacing of the shroud's ratlines in proportion to the crew members. There are more ratlines here than on conventional models


Another overview showing two separate templates for the build within the main deck waist. The lower template show the revised cannons in both run out and recoil position which has enough room to clear the bulwarks and gratings.

This conclude Part Two of the modification. There is much more to study before I move forward on this. However, from this assignment, I have come to learn more. I realize 'today' that Airfix models are a professional type model that is intend for those who are patient in the build for a museum type model of quality. There are many possibilities with this kit...and the plastic is of good quality to make changes that suit the builder.

Pieces are very small and to replicate them in another medium does require some skill. The drawback is missing pieces that can place a build 'on hold'...But for the experienced novice/professional, such parts can be customized.one can alter to be museum quality.

There is another factor that is overlooked with Airfix models; that is the scale. The company was precise in it, but the issue came up in debate on forums because builders couldn't match the scales based on the information given by the company. With a little investigative work I found that certain areas of each kit were either over-scaled or under-scaled. To alleviate that problem I picked two areas on the model that balanced in scale and reworked the entire model.

The two areas I studied were the steps, doors, and gun ports. I then made a crew figure template with additional deck furniture (to that scale) -giving me the precise measurements for all the fittings throughout the model. This procedure upgraded the Airfix kits to be a perfect 'one of a kind'.

There's not much more I can write on this blog segment except that we're in the midway process of the build. I appreciate your viewing this and will conclude the hull factor in 'Part Three' before moving on to the rigging. 

Fairwinds!   


Monday, February 15, 2021

H.M.S. Prince c.1670 -The Art Of Modification/ Rex Stewart


This portside view defines the beauty of this popular kit that was introduced in the mid 1960s. It is a current build that was to have been part of the trilogy series I started in 1980. Before pursuing scratchbuilding work, I acquired plastic kits for this academic study. In them I could experiment with different applications such as using custom made parts made of wood, metal, and various fibers to get certain details I researched from publications...The first such experiment began with the Airfix Classic Series model SAINT LOUIS of 1626.


Here in this in this 1980 news image, I am working on the Airfix Saint Louis c.1626 that was part of the Classic series -and the first to be part of the 'trilogy build'. The British company was producing outstanding sailing ship models at the time and it was my desire to build three models of its Classic Series edition to show (in detail) the rigging types of the 17th century. To accomplish this I needed the best references -and because I couldn't afford them, I reached out to the business community to assist.

I had already attained support from the Jewish girls at the University I attended as an art student relative to stain/varnish applications -along with the technique of gold leafing. So, it was just a matter of time before I could get this quality of workmanship exposed to the general public. Twenty years later these models were acquired by collectors for their intrinsic beauty thanks, in part, to that culture.

The book that is shown in the photo is the ever-so-popular "The Ship" by author Bjorn Landstrom. I used his illustration of Saint Louis and two other references to complete the build. So detailed was this plastic kit that those who visited wanted to purchase it. I enjoyed it for a few years and finally released it -placing on hold my ambition of completing the "Airfix Trilogy".


Upon releasing the SAINT LOUIS to an area businessman/collector, it would be 41 years before I would, again, get the opportunity to finish the 'trilogy'. Last year I searched every corner of the internet for a vintage H.M.S. PRINCE model -having finished both ROYAL SOVEREIGN (Sovereign of the Seas) and the Airfix WASA. Those models were gifted to me by a local woman whom father took ill and recommended her to locate and phone me of his inventory.

At first I didn't see the total picture of the acquisition until I finished both kits, then the revelation came. It was the appointed time to engage the trilogy again, applying to it the new and updated skills I developed. Both SOVEREIGN and WASA was well received via the internet; and of those few who witnessed the builds in person, the expression on their faces became the testimony. It was then that I knew the trilogy was an assignment to be completed.

The above photo is the Airfix Classic Series H.M.S. PRINCE that I received last year.

 With anticipation, I carefully opened the box and studied each piece - writing notes concerning what I would keep and/or discard in the build. I also evaluated what wooden replacements would be handmade in place of those pieces discarded. However, before the build was to begin, I had to copy my former projects SOVEREIGN and WASA by way of preparing new rigging diagrams.


Here, I correct notes to update rigging. I studied various Prince models, both museum and professional  -including kits...finding that additional lines were omitted for the sake of clarity. I have always been thorough in research and build. This newer PRINCE was no exception.

I had the good fortune of building two PRINCE models some years ago (from scratch); one a large cutaway and the other a 1/16 scale miniature. In the miniature I applied minute detail that invited  serious collectors of which it was finally released to a Texas businessman whom eventually commissioned other miniatures to compliment his collection.


                         Working the large scale 1:12 Prince Cutaway during my early years.


                                 Detail closeup of miniature PRINCE fully rigged 1/16 scale.

The next photos show the process of how I address the hull. It's time-consuming but well worth the investment to carefully assess all the pieces of the kit. I noticed the deep grooves that was supposedly meant to highlight the planks; but it's vital to know that no such grooves existed on these vessels. Planking was tight -and the same is true for the decks. The grooves are raised -and it would make for a more realistic, attractive model if the decks are partially sanded or replaced with actual wood decking. For these models I chose to replace the plastic with wood.

Below are two photos showing my application of wood filler to the grooves prior to sanding. Normal drying time for filler would be 24-48 hours before working the hull. During this time I returned to the blueprints to study and alter deck furniture arrangement, which included the stowed boats. The schematics would be rough drafts until I got more involved with the build; it would then require more  accurate details. But for the moment my focus remained on the drying filler. 


After the filler was dry (and sanded to the touch), a soft bristle brush was usedt absorb the debris  I blew away as I wiped in a front to back motion. This is best because it will give some idea as to whether or not another application is needed. The gunports were cut out during the drying stage as I held each hull piece with a paper towel. In doing this, hand oils are prevented from marring the surface -leaving it clean for smooth painting. As a result the paint colors are richer and look realistic with a patina finish. 


Beautiful is an understatement relative to the galleries of PRINCE. Of course there were a number of impressive looking British ships of those times, but because of the general population voting on this ship -based solely on visual perception, the Airfix engineers wasted no time perfecting this detail. And as such, I took it another step further by carving away the excess and added more by way of adhesives and parchment.

With those additions more detail was achieved by cutting away the gallery windows to later add acetone windows as shown in the supporting image.


The next process was for me to quickly go over the interior to decide what modifications would be worked first. I knew the bow had to be addressed. However the interior was equally important since I had to revise the gun barrels in proper scale to fit the ports...Past this, I moved on to the bow.

I would consider the bow the most challenging area of the ship, simply because more rigging runs there than in any other place. Much of the area is tight, but can be successful to rig provided it's not rushed; especially for 17th and 18th century ships. As for design details, I make every attempt to keep it scale-friendly. In otherwords, drafting figurine images/ deck furniture to use as a template for custom work. Below, I'm carefully routing into the plastic -imitating the detail that is featured on the museum model at the Kennington War Museum in England. Also, I've modified the figurehead with a few added details which appears in the second image.


On the issue of techniques...

Often I receive requests concerning my applications to both scratchbuilt and kit assignments. And frankly, I don't share that information because each artist/craftsman has a special gift that is solely unique unto that individual. I can't say this enough. It's one thing to clone a subject matter, but another to usurp one's identity to it with similarities.

I encourage potential artistans to find their own path and explore (with research) their own gift. It's easy.

Now that I've cleared the air, I move on to the next process which will be featured in 'Part Two' of this series. There will be unspeakable details that will alter how future modelbuilders will view this subject...whether it be from a kit such as this, or created from scratch. Whatever the medium, the subject will still 'float' the same. The name will still be the same. The only change will be overlooked details.

It's been a pleasure introducing this vintage kit that was introduced on the market nearly 60 years ago. There are still many unbuilt kits in existence which should be considered 'built' and viewed for enjoyment as they were intended. For this, I raise my glass to the early engineers and draftsmen who designed this model. It is, and was one of the masterpieces of the day and I'm fortunate to be able to bring it back as part of my trilogy to Airfix.

Thanks for viewing!

Sunday, June 28, 2020

Swedish Warship VASA -The Finale/ Rex Stewart


The finished Vasa model -shown with full sails in the appearance of what the ship would have looked like had it not sunk. After seven months in this build, I finally was able to get all the minute details.

As with all my work, past and present, there is a sense of accomplishment that's difficult to explain. If so, it would have to be in book form...if that's possible. I don't know. But what I do know is history is a wealth of information accessible to anyone who dares to explore it.  There are no limitations to it, just the fact that it's there for the taking.

When a subject comes to the general public, and it's marketable; that subject takes on a life of its own. From it are many variations and in most cases that subject is scrutinized. However, the point is to enjoy the work, not debate it. With that approach, true satisfaction is achieved and more works can (by choice) be realized.

This Vasa model is just one of 'many' models I've engaged over the years. No different from any, but a collection of all in various mediums and classes. This is one of my specialties as a historian-artist.


My experiences from times past is the anchor for my successful journey 'today' in the maritime arts... which also include ship models. And this Christian testimony is given to God's glory and not man's. However, from a social stance, I have been fortunate to connect with those of maritime excellence -obtaining information that would push His work(s) to a greater level of visibility.

And yes, we will have mockers in this business; but the fact remain that NO GOOD WORK will be hidden. That's an absolute that men have tried to challenge...and failed.

Here, I sit on the deck of the Dutch VOC replica HALF MOON looking over the original plans of the contemporary ship that Nicholas Benton and I designed in the summer of 1987. My involvement was the design of the topsides based on his trip to the Netherlands to acquire the data.

Below, the Royal Family sit before my accurate model of the contemporary ship which was celebrated at the Waldorf Astoria in New York City that fall of 1989.


After that celebration,  22 years later I was again commissioned to build another HALFMOON model at a larger scale to parallel New York's Hudson-Fulton Celebration 400...And because no one had the original plans (but I and Benton), the model had to be in exact detail to the actual ship.

Below, a large scale diorama I created depicting the Lenape natives advancing toward Half Moon that September of 1609 (at the mouth of the Hudson River)...The diorama commemorated the Hudson-Fulton Celebration as part of a downstate Ellis Island Exhibiiont which was commissioned by its curator, Dr. David Ostreicher.


Here, during the Hudson-Fulton 400 Celebration, Dr. David Ostreicher lectures about the Hudson River, the ship Half Moon (Diorama), and the Lenape Tribe in New York City that fall of 2009.

After the diorama project, I went on to explore the possibilities of building additional Half Moon  miniatures -along with other ships...such as Prince, Endeavor, Batavia, HMS Revenge, and others. Those sailing ships were interesting builds which motivated me to explore the possibility of enhancing existing kits through modification. And  with that came this current build which is now featured in this blog and added to the roster of detailed models.

There's very little I can say that hasn't already been said of this vessel and its history. So many  models exist that the beauty and design clearly denotes Vasa's identity. Therefore, the remaining closure to this blog will be the images of  'the finish'.

I raise my glass to the Swedish people for bringing the actual ship to the surface and providing professionals like myself the opportunity to study the history from a creative perspective. Furthermore, I'm indebted to the Dutch culture in The Netherlands for their input and support relative to providing me data forwhich my models have been based...That, alone, is priceless.

Now, I present these eight images of the finish...


As aforementioned, my sails are custom made of treated bond paper. These are antiqued over a five to ten year period so that I achieve beautiful folds while shaping them. There are no visible (if any) punctures in the material; and the rigging that's applied set these off nicely.


Below are two profile views showing the gracefulness of Vasa sails and how artfully they fall insync with her superstructure...One of the reasons it's one of the most sought-after subjects in modelling. Also, the symmetrical rigging (whether loose or tight) -draws the viewer to examine its properties.  For me as a youth, this was a fascination to view these lines at my local Boy's Club.

I would go directly to the clipper ship model at the entrance -being intrigued by it's rigging. There were no sails, just those awesome lines running through blocks and being belayed to the decks and tops. That, alone, sparked my interest to pursue the art.


The next two views show the lines and their complete belay falls which was one of the challenges I embraced for the purpose to have other builders engage modification. Anything can be upgraded to excellence, as shown in these images.


These last five images are profiles of a fine model in the Airfix Classic Series on WASA c.1628.
This was one of the best kits when it was introduced in the 1960s -along with the forerunner ROYAL SOVEREIGN, which was followed by the SAINT LOUIS c.1626.


This concludes the Vasa build; and I'm delighted you enjoyed the entire presentation. Of course there will be other Airfix models I will (overtime) modify.

As for those who have kits that wish to be finished for enjoyment and/or display, I can honor your request. Kindly email me at Caseships@yahoo.com or PM (private message) me at my Linkedin page https://www.linkedin.com/in/rexstewart. Other work(s) can be viewed at https://youtube.com/c/RexStewartoriginals

Thank you for viewing!

Wednesday, June 17, 2020

Art Of Rigging The 1:144 Scale VASA/ Rex Stewart


Here we are ...the second and final phase of this build -VASA's rigging.

In this segment the standing rigging, along with the tackle systems will be covered. For this, it is important to zone in on what's written concerning this process and/or area of build...I must have said this a thousand times over the years for builders (novice and professional) to not rush their projects for acceptance, but to evaluate (and re-evaluate) their research to make sure ALL the i's are dotted and all the t's are crossed. Especially in the rigging phase.

I have read several contemporary blogs regarding both plastic and wooden kits relative to the impossibility of rigging miniature models with the same amount of detail as their larger counterparts. That incorporating miniature detail to these smaller models (both in hull and rigging) would distort the scale -and that the quality would be compromised to those kits that were readily prefabricated. Not true, because the beautiful word 'modification' bring into existence, by way of research, the probability of achieving the best in any kit.


The first criteria to good rigging is good planning...

Here, I just finished a partial rigging table for VASA.

Rigging tables can be beneficial for both present and future use, especially when possible clients request a second or third build from the original. Every artist/builder has their own style and/or method that makes a work a 'signature'. A work of art that is easily identifiable by a discerning buyer and/or collector...Finally, since builders have their own interpretations, it is best that such information be safeguarded.

For years I have researched and re-worked rigging tables based on the studies of others and have discovered more details that have enriched my line of work.


After finishing rigging tables, sails are bent to how I want them featured. For this particular model I want to make the sails appear wind-blown. This will take a lot of engineering to make paper appear cloth-like. Also, to have the lines appear realistic in their fall/belay locations. Here, in the backdrop of the sails, I show a rough pre-sketch used to support the actual configuration(s).

Notice that all blocks and lines are added to both sail and yard(s). This procedure make it easier for the rigging process to move smoothly. One sail can take a day to produce and rig... Sometimes two to three days as shown in the photo images below which depict the main course sail.


Main Course Sail...front view.


Main Course Sail...rear view


Blocks and tackles...tackles and blocks -one of the areas of build I found to be most challenging (to the testing of patience)...In the image below, the miniature blocks and tackles illustrate how awesome a model can become. To make this happen I utilize my personal tools dubbed the "rigging chopsticks". These were made to perform a jeweler's style art to the rigging as shown in the two photos below:


Applying the blocks and silk lines using "rigging chopsticks".

In the above images, progressive results can be seen with the use of these sticks...and the detail becomes  'front and center' for quality. This instrument is not only capable for securing rigging lines (in perfection), but can also assist with the gentle curvature of lines in areas where it seem impossible to reach.


Billowing effects show the gentle curves on the spritsail edges and sheet lines. Also in the lower photo image, details are shown in a deck closeup of belayed lines and coiling-a result from using the "chopsticks".


Here, another angle showing sheet and tack lines hanging loosely to simulate realism.


Starboard bow showing the attached bowlines on the forecourse -along with the tacks and sheets. Once these lines are established, it is here where patience run its course... Again, the "chopsticks" come into play because none of the lines can be attached with tweezers without fouling existing lines. The long metal point of the sticks are thin enough to get lines through the small areas and be effective enough to secure them to their respective pins. Tweezers only serve to assist those lines.


With the sprit(s) and forecourse sails established (as shown), I now work my way to the flags.

In my most humble opinion, flags can make or break the appearance of a good model. Depending on how a model is presented, it is best to have the flags in unison with the sails. If sails are full and limp, then flags should follow the same pattern. If sails are in a slight or full breeze, then flags should be the same...And finally, when wind push sails back against mast(s), flags should be angled sideways (port or starboard) and/or flying backward. Wind pushing sails forward the mast, sails should be forward or angled sideways in forward position. Former servicemen brought this to my attention when I built commissioned kits during my youth.


This image show the paper flags provided by the Airfix manufacturer. These are not properly scaled for the model; so to correct this, I cut a smaller version and changed the paper thickness -applying the references from Bjorn Landstrom's book concerning his graphics and colorscheme.


Here, the new flags and pennant are fashioned as windswept pieces. By placing these flags on the masts (prior to finishing the remaining sails), gives a visual blueprint on how those sails will be bent based on the formation of the flags.


With the foremast sail and rigging systems in place, I now move on to the mainmast -using photo references to get the proper folds and bends of my sails before applying. This can be a long drawn out process since the sails are paper that can be easily torn or punctured. However, with years of practice, I've been able to achieve realistic settings concerning them.

In my prime as a builder, I studied Asian artists and adopted some of their techniques in my work to get a step higher with miniature projects -especially in the genre of sailing ships. I realized that silk had properties that would later fit into my rigging concepts -and that chopsticks and sandpaper would serve to bring about the very detail I was expecting in ship modeling.

Viewing the images below, the point is proven as I address VASA's mainmast.


In the four above images the main course and topsails are installed...shaped to display a billowing effect in those sails. The last image show the lines secured to the knights and pinrails on deck. These are also secured in the tops to fulfill the assignment of a complete rig.

At best, the latter half of the rigging process is the most difficult because the lines are much tighter together. This is one of the reasons the rigging chopsticks is an invaluable and exceptional tool. I can get immense detailing with it...So now I continue with 'the finish' of the main mast and move on to the mizzen -beginning with the lateen sail shown in the image below.


 This now finalize the last phase of the rigging.

The next blog will feature limited photos on the completed model based on the late Bjorn Landstrom's book "The Royal Warship VASA".  The build has been interesting, to date, because the book brought in depth study of how the ship was built. That, coupled with my research on her rigging made this a unique project of note. So now I close being satisfied that I can encourage other builders (whether hobbyist or professional) to study their kits and make the best of them.

I an not in the business to 'compete'...Never have, never will. My purpose in the maritime is to give insight into the world of shipmodels and take place it on a subtle plateau of visibility so that others can be encouraged to take it to another level of excellence by their choosing.

As for those who have kits that wish to be finished for enjoyment and/or display, I can oblige this. Kindly email me at Caseships@yahoo.com or visit my Linkedin page and supporting youtube page at https://www.linkedin.com/in/rexstewart/ and https://youtube.com/c/RexStewartoriginals . I can also be reached at 1-774-757-7137 for details.

I now leave you, the viewer, with these thoughts and look forward to your next visit on this subject of the Swedish frigate VASA. Fair winds!