In my last blog I spoke about not being too consumed in a build. It's always good to walk away when the mind touches upon frustration. Others will argue that it's 'healthy'...but there are consequences when attempting to force a thing.
I know only a few will heed my advice, and this will only rob those who are proud to not really digest what I'm writing. I didn't get here to this level shucking peanuts; I got here because I was 'willing' to read the literature of my forerunners to get the schematics of the process. I threw away the vanity and the politics to embraced the method and techniques. That's how hungry I was to be one of the best in what I do.
The above image show the detailed bow and anchor arrangement of the Classic Series -Airfix HMS Prince. The colors are subtle and not overworked -lending more attention to details while the goldleaf absorbs the viewer. Goldleaf doesn't overpower the model, but rather introduce a natural balance that the eye can absorb.
Below is my wood sculpted diorama titled "The Admiralty" which shows Phineas Pett among other subjects viewing and discussing a build for one their ships. It was one of his designs that brought the H.M.S. Prince to sea.
Now that we're past the concepts of the hull, it's time to move on to the masts and rigging. Such is a complicated subject to discuss and I won't waste any time 'there'. My sound advice relative to it is simple: research, read, and research again. That's the jewel of ALL jewels -the ability to read and cipher between fact and fiction. The quality of my builds stem from the desire to compete with self. There is no good in competing with another; you take on their burden while attempting to finish yours. Also, don't make comparisons...just be honest about your assessments for which to make a point.

I made mention in one of my earlier blogs, that belay points were carefully studied before permanently securing the apparatus that was used for rigging this type ship. Furthermore, the locations had to be featured both on the masts/yards (and decks) where the falls would not foul the lines. In the process I noticed that the garnet tackle was wrongfully rigged on the top rail of the main deck. The scale would not place it there, but rather on the deck with a bitt piece (and ring bolt) which would secure the lower hooked block of the garnet. I found that the lashed spars would conflict with this tackle, so I made alternate bitts (port and starboard) and placed this apparatus portside.
In future photos I will show this detail...
Another oversight was location of the fore course tack lines. I must concede that I flawed in my earlier builds of this vessel. Some experts stated that my lead and fall was accurate, but after seriously pouring over the plans, I realized I was just executing another fine-looking model. In this image I made bitts forward of the mainstay deadeyes for which to take on and secure the course tacks. This would in no way foul the other principle lines leading to their correct pins.
Below a model of the ST. GEORGE, 1701.... show those course tacks belayed in the same area. So, in essence, this is correct. As long as the lines are not overlapped on the same belay pin, the builder is fine. However, I did find that the topgallant and topsail bowlines overlapped; but those were of the same system and separate from the other functional lines.
With that information secure, I'm now ready to rig...
As aforementioned, advance rigging takes much observation and preparation. The key to it all is to get the tackles on the mast (first); followed by the stays. Then, the rigging blocks must be attached as you work those two systems. Finally, the topropes and their tackles...Below are four images showing this process. Also, don't be particular about the outcome of the rigging process. Mistakes will occur; and don't take anyone's opinion as law. Things look good on paper (plans), but the true value of a thing arrives at the conclusion. Just because it's on paper, doesn't make it fact.
Build the model and you will discover your facts as you build. Sound and perfect advice to those who are willing to apply it.
The first application of rigging to PRINCE are the relieving tackles that are seen beneath the tops; followed by the stays. If the stays are applied first, then there's no need to focus on these tackles because it will conflict with the shrouds. Next is the garnet tackle(s) which is carried on the mainmast over the relieving tackles...After these are applied, move on to the stays and the webbed rigging above them known as the crowsfeet. That feature was to prevent the foot of the topsails from chaffing against the stays.

The final process before the shrouds are rigged is the sprit topmast backstay seen at the upper righthand; and the manropes (port and starboard) that lead from the forward bulkhead above the doors to the back stem of the topmast cap in the top...And last, the topmast topropes...and their tackles (that are rarely seen in good models).
The last two images show a partial finish of what I just mentioned -which will conclude in this blog before moving on to Part Six.
There is another important detail that need to be made mention of in the tackle system that can't be avoided. These are the truss tackles -a system of combined blocks and multiple rigging that was used to raise and lower the fore and main yards that were attached to parrels. These parrels expanded (with the help of the truss tackles) as they traveled over the wooldings as they were raised and lowered to the deck.
I've witnessed many builders producing detailed models, but shy away from the important details that would make the model authentic. A properly rigged model is worth its weight in gold.
In this photo I am reviewing details that I either missed, or need to revise. Such notes can be very time-consuming but worth the effort when it's effectively presented. It's not about being scholarly; it's about revealing buried information that go unnoticed...All the more reason these models are sought after by serious collectors.
As I continue to rig, I discover that more belay points/pins are needed. Early kit producers only gave generic/basic rigging leads; but omitted those that were essential to model building -especially on the PRINCE (and other 17th century ships). These lines were the various tackles, topropes, halyards, and proper bunts and leeches. Many models barely feature them -and these were the main systems for keeping the ship operational.
Below, I begin to address the rigging process by placing the miniature blocks on the masts and tops prior to rigging -and then secure the tackles before placing the shrouds.
Here, the tackles are applied, but more must be added. In most contemporary models tackle falls aren't visible and must be found. The falls must be true to rigging standards relative to where those leads tie off. I've come to find that some of these lines were not on belay pins (as such) but on eyebolts with blocks that were in tackle form which were belayed on the lower rigging of those blocks -as shown behind the mainmast next to the companionway.
The image below show the early stage of shroud rigging...
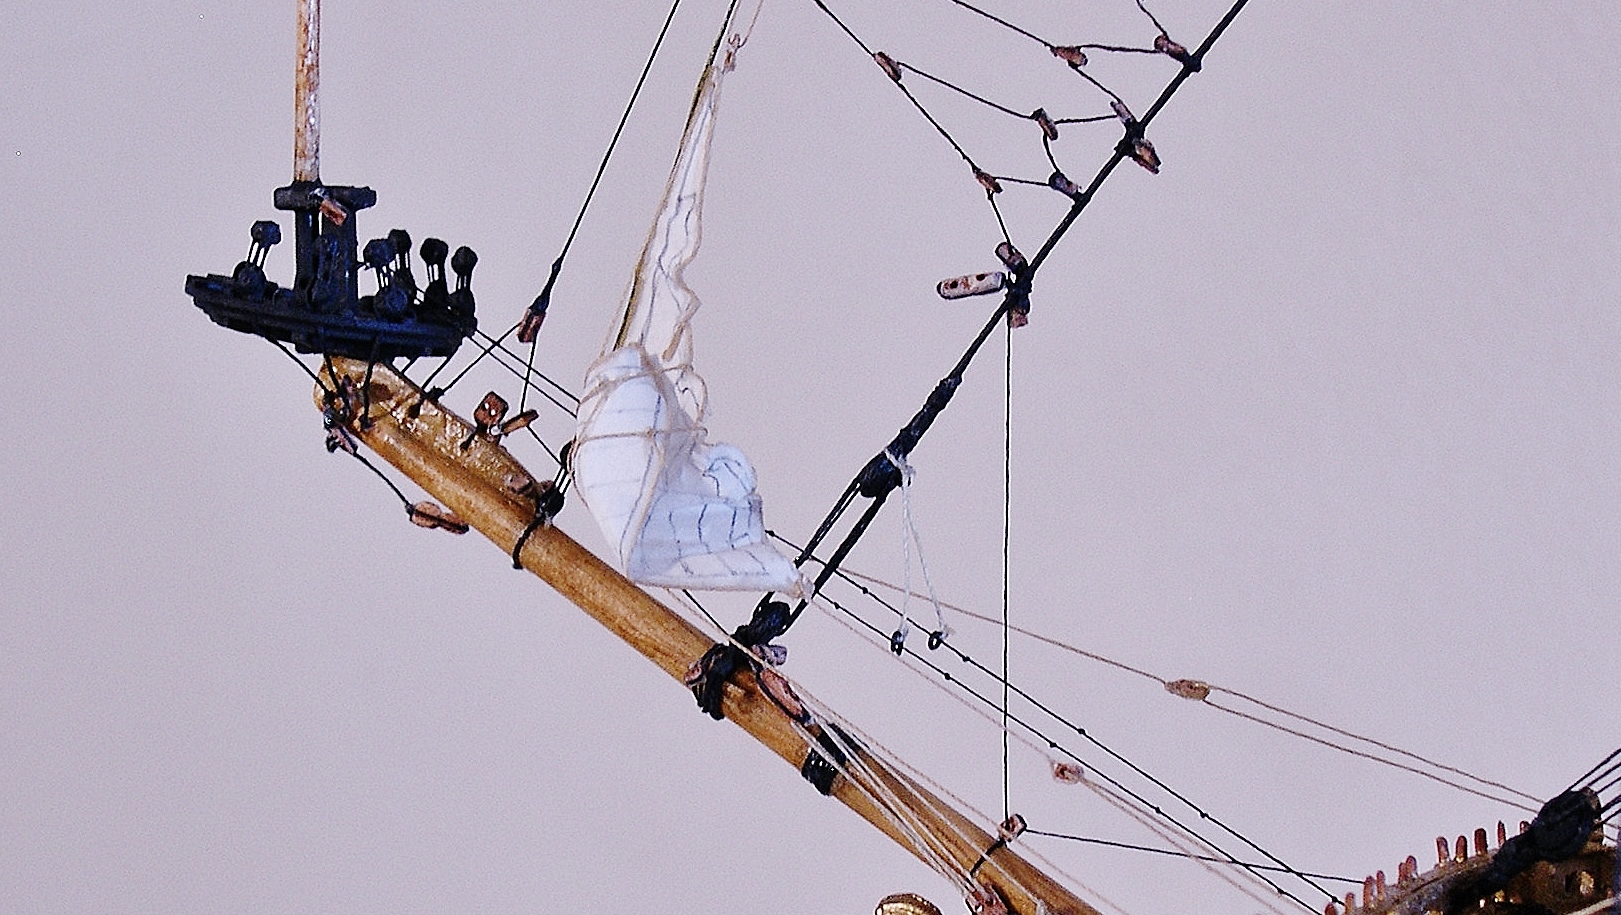
Another application that I apply before continuing with the shrouds is rigging the jib. I usually draw out a rough sail schematic in lue of making a decision on how best the model will look to the viewer. I attempt to keep it authentic by mimicking sail formations on contemporary photos. However, I don't copy them to the letter, as such; but apply the basic generics (with my thought process) to give a more dramatical flow of canvas as if the ship was before the wind....But the process begin with the lead sails. The flow starts there.
Here, I begin with the jib. I tried to make it as realistic as possible which included the folds and reefing.
Another common detail that seem to evade 17th century shipmodels are the crisscrossed lines on the lower and upper shrouds shown in this image. These were essential for strengthening the shrouds and were called catharpins. It seems difficult to rig these, but if the steps are applied faithfully (with concentration), it's fairly 'easy'.
I now leave the viewer with this image of the progress. However, I must be clear relative to these type models. Understand that there are no absolutes with the rigging process of these ships except that the applications were basic and true to the writings of the forerunners. It's those writings that I followed to conclude my spin on the process.
Over the years curators have falsely claimed that the rigging on the Prince was done during the time of the build; but the fact of the matter was when the actual model was purchased by the Kensington Science Museum in 1895 it was unrigged. The rigging was done in 1898 but wasn't found satisfactory and was subsequently redone correctly some years later. Yet, the question remained regarding belay systems that seem to have evaded those scholars of that time.
That being said, one can only speculate (with experience) where those systems began and ended on the conclusion of the lines themselves. So it's only fair to not assume but work those belay points where those lines would seem efficient for the crew member to work. I've done this to the best of my ability with all these models to the satisfaction of my collectors and scholars in the field.
Of course I've faced unprecedented scrutiny in the process, but that usually comes with the territory of painstaking research. This is what make my work what it is and I continue to push it forward with purity, not politics.
Airfix was true in designing this kit with what limited information it had -and I must concede that those engineers and draftsmen/women did a fine job of it. But with further global information, this model brings to bear even deeper revelations which, in part, make my work rare.
I appreciate the follow and hope you will be ready for 'Part Six' of this series.