Showing posts with label unitedkingdom. Show all posts

Wednesday, March 24, 2021

Airfix 1:180 Scale PRINCE...The Art Of Modification/Rex Stewart -Part Four


This is a more advanced image of the PRINCE current stage, but it has enough finished detail to now focus on the upper batteries and channel deadeyes.

I realize that this will probably be a seven to eight part blog. However, it's worth writing, especially when serious builders want to further their skills relative to historical detail(s) as opposed to the generic -or common practice.

I can't say it enough about 'admiralty models'..Again, they were not accurate in the sense of scale, but rather beautiful art pieces that were visual prototypes for building the actual ship. Builders get caught up in thinking that these prototypes were, in essence, the 'bible' to naval architecture. They weren't; and to believe that is a misnomer. I was fortunate to learn this (the hard way) years ago when a serious collector 'collectively' corrected me on certain details that I copied from a admiralty model. He waived the advances (out of respect for my work) and had me repeat the build with written data from writings of that period. That model became the cornerstone for all my models -including steamboats.

The images I'm about to place here will stem from actual documentation -and not speculation or theory. This is what makes a model unique and beautiful.

In my last blog I showed how I customized cannon to fit properly in the ports. Here, I show them from various deck angles which give a realistic feel of duplicating the actual ship...This is due, in part, because of proper scaling. Below are four images to support this:


A port broadside overview showing the complete gun batteries in both coil and recoil positions on both the main and quarter decks.


Portside stern overview showing another inboard/outboard perspective of the cannon and grates. On the original model the grating was too close to the mizzen mast and was relocated further ahead to the  quarter deck fore rail area. It was scaled wide enough to make room for the carriage tackles running in and out the cannon.


Starboard profile of main deck artillery...
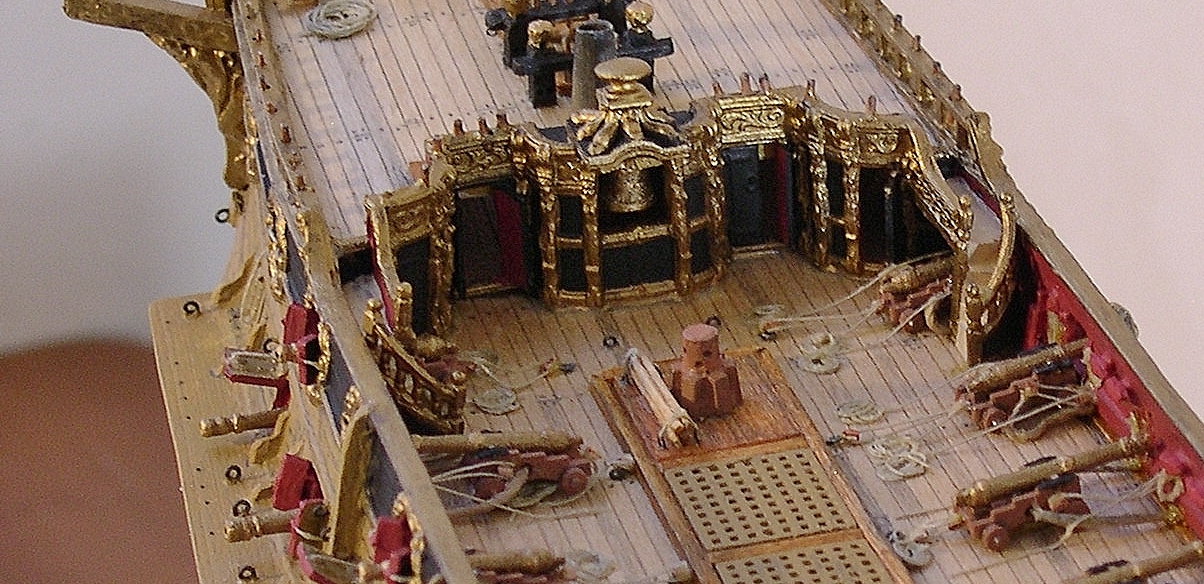
 

Port overview showing the forecastle belfry, companionways and inboard/outboard cannon and tackles. Instead of keeping the full capstan, I removed the upper portion and replaced with a hole-drilled dowel and made wood capstan bars which are shown belayed on deck.


Port stern view showing partial full main and quarter deck cannons. This was the final deck installation before moving on to the channel details. On the admiralty model the belay pins were atop the rails. Unfortunately, because the Airfix version was off scale in this area, I had to compensate by placing the pinrails inside the bulwarks.

Over a hundred or so models I researched on Prince, I noticed details missing that encouraged me to place more emphasis on this. With the channels I noticed eyebolts missing which took the relieving tackles; but this was also evident in the tops. On the main channel the lower studding sail boom and cradle wasn't featured (on any of the models); nor knees attached to both channel and hull to strengthen it (channel) for taking on the heavy boom and relieving tackles. Below, I show this detail in a Willem van de Velde II study of the English ship  VICTORY which was built in 1620...She is shown as she appeared in 1666.


There is another possibility at play here; the fact that this was, and could be, a spar lashed alongside in the event that a topmast was lost at sea due to inclement weather or sea battle. There is another spar at the quarter deck tier which is lashed as well. However, in the Kennington lists of the 1650s, studding booms were mentioned for the main mast and must be presumed to fit on the main channel.

For a model builder, it's a judgement call. For me, I chose to feature this detail as an additive to European maritime practice as shown in the photo image below.


Another portside overview showing the studding boom and cradle on the left at the deadeyes and  channel...


Research is what you make it; it can be intense or it can be mediocre...but at the end of the day you own it. This is why I try to make the best of my materials and look further into documents to find whether things are 'political' or whether absolute. In my journey I've danced with both and I found this great peace of knowing truth -which is why these pieces are at the level that they are.

Now that I've clarified the studding booms, my next process of the build are the masts.

To join plastic to wood is a tricky endeavor. The right glue is needed and a ton of patience. Since I will be using the plastic tops, caps, and crosstrees; it's essential that I carve the wood masts a millimeter smaller than the actual (plastic) masts so that these can be fitted properly in the routed cavities where the plastic was. To keep the wood in those cavities I carefully drill holes in both plastic and wood pieces -gluing a metal pin in the wood and then sliding the open air part of the pin into the plastic. Being careful not to have glue touch the exposed areas since these have to be stained, varnished and painted.

Below, I shave away excess wood to form the mast...


Notice the partially finished mast above my carving hand; and notice the completed mast below. To actually view it, one would be convinced that it was totally wood.


The next step of the build is to study all the belay systems before stepping the masts. This is very important, because once the masts are secured, there's no possibility of having all the lines rigged. This can take several weeks...sometimes a few months; and serious builders/collectors know this.

Below are several views showing the masts, and how they will appear on the model before the rigging is started.


This concludes the fourth part of the HMS Prince build. I truly hope that what I've stated can be beneficial to those who currently own the Airfix kit. Understand that no kit is a hundred percent intact by way of fitting together parts. Every kit has its pitfall, no matter how detailed.

What will guarantee a nice model will be the patience in building it. There will be moments of anxiety and frustration; but that comes with the territory of discovering new information and/or techniques. Quality depends on how much time one is willing to put in a project...but, NEVER get consumed. That will only drain your focus. The 'first' PRINCE drained my focus, as the model was attractive; but, common mistakes were made. However, I corrected those flaws and am satisfied with this current work. 

That being said, I close this portion to make way for the next.

Fairwinds!

Monday, February 15, 2021

H.M.S. Prince c.1670 -The Art Of Modification/ Rex Stewart


This portside view defines the beauty of this popular kit that was introduced in the mid 1960s. It is a current build that was to have been part of the trilogy series I started in 1980. Before pursuing scratchbuilding work, I acquired plastic kits for this academic study. In them I could experiment with different applications such as using custom made parts made of wood, metal, and various fibers to get certain details I researched from publications...The first such experiment began with the Airfix Classic Series model SAINT LOUIS of 1626.


Here in this in this 1980 news image, I am working on the Airfix Saint Louis c.1626 that was part of the Classic series -and the first to be part of the 'trilogy build'. The British company was producing outstanding sailing ship models at the time and it was my desire to build three models of its Classic Series edition to show (in detail) the rigging types of the 17th century. To accomplish this I needed the best references -and because I couldn't afford them, I reached out to the business community to assist.

I had already attained support from the Jewish girls at the University I attended as an art student relative to stain/varnish applications -along with the technique of gold leafing. So, it was just a matter of time before I could get this quality of workmanship exposed to the general public. Twenty years later these models were acquired by collectors for their intrinsic beauty thanks, in part, to that culture.

The book that is shown in the photo is the ever-so-popular "The Ship" by author Bjorn Landstrom. I used his illustration of Saint Louis and two other references to complete the build. So detailed was this plastic kit that those who visited wanted to purchase it. I enjoyed it for a few years and finally released it -placing on hold my ambition of completing the "Airfix Trilogy".


Upon releasing the SAINT LOUIS to an area businessman/collector, it would be 41 years before I would, again, get the opportunity to finish the 'trilogy'. Last year I searched every corner of the internet for a vintage H.M.S. PRINCE model -having finished both ROYAL SOVEREIGN (Sovereign of the Seas) and the Airfix WASA. Those models were gifted to me by a local woman whom father took ill and recommended her to locate and phone me of his inventory.

At first I didn't see the total picture of the acquisition until I finished both kits, then the revelation came. It was the appointed time to engage the trilogy again, applying to it the new and updated skills I developed. Both SOVEREIGN and WASA was well received via the internet; and of those few who witnessed the builds in person, the expression on their faces became the testimony. It was then that I knew the trilogy was an assignment to be completed.

The above photo is the Airfix Classic Series H.M.S. PRINCE that I received last year.

 With anticipation, I carefully opened the box and studied each piece - writing notes concerning what I would keep and/or discard in the build. I also evaluated what wooden replacements would be handmade in place of those pieces discarded. However, before the build was to begin, I had to copy my former projects SOVEREIGN and WASA by way of preparing new rigging diagrams.


Here, I correct notes to update rigging. I studied various Prince models, both museum and professional  -including kits...finding that additional lines were omitted for the sake of clarity. I have always been thorough in research and build. This newer PRINCE was no exception.

I had the good fortune of building two PRINCE models some years ago (from scratch); one a large cutaway and the other a 1/16 scale miniature. In the miniature I applied minute detail that invited  serious collectors of which it was finally released to a Texas businessman whom eventually commissioned other miniatures to compliment his collection.


                         Working the large scale 1:12 Prince Cutaway during my early years.


                                 Detail closeup of miniature PRINCE fully rigged 1/16 scale.

The next photos show the process of how I address the hull. It's time-consuming but well worth the investment to carefully assess all the pieces of the kit. I noticed the deep grooves that was supposedly meant to highlight the planks; but it's vital to know that no such grooves existed on these vessels. Planking was tight -and the same is true for the decks. The grooves are raised -and it would make for a more realistic, attractive model if the decks are partially sanded or replaced with actual wood decking. For these models I chose to replace the plastic with wood.

Below are two photos showing my application of wood filler to the grooves prior to sanding. Normal drying time for filler would be 24-48 hours before working the hull. During this time I returned to the blueprints to study and alter deck furniture arrangement, which included the stowed boats. The schematics would be rough drafts until I got more involved with the build; it would then require more  accurate details. But for the moment my focus remained on the drying filler. 


After the filler was dry (and sanded to the touch), a soft bristle brush was usedt absorb the debris  I blew away as I wiped in a front to back motion. This is best because it will give some idea as to whether or not another application is needed. The gunports were cut out during the drying stage as I held each hull piece with a paper towel. In doing this, hand oils are prevented from marring the surface -leaving it clean for smooth painting. As a result the paint colors are richer and look realistic with a patina finish. 


Beautiful is an understatement relative to the galleries of PRINCE. Of course there were a number of impressive looking British ships of those times, but because of the general population voting on this ship -based solely on visual perception, the Airfix engineers wasted no time perfecting this detail. And as such, I took it another step further by carving away the excess and added more by way of adhesives and parchment.

With those additions more detail was achieved by cutting away the gallery windows to later add acetone windows as shown in the supporting image.


The next process was for me to quickly go over the interior to decide what modifications would be worked first. I knew the bow had to be addressed. However the interior was equally important since I had to revise the gun barrels in proper scale to fit the ports...Past this, I moved on to the bow.

I would consider the bow the most challenging area of the ship, simply because more rigging runs there than in any other place. Much of the area is tight, but can be successful to rig provided it's not rushed; especially for 17th and 18th century ships. As for design details, I make every attempt to keep it scale-friendly. In otherwords, drafting figurine images/ deck furniture to use as a template for custom work. Below, I'm carefully routing into the plastic -imitating the detail that is featured on the museum model at the Kennington War Museum in England. Also, I've modified the figurehead with a few added details which appears in the second image.


On the issue of techniques...

Often I receive requests concerning my applications to both scratchbuilt and kit assignments. And frankly, I don't share that information because each artist/craftsman has a special gift that is solely unique unto that individual. I can't say this enough. It's one thing to clone a subject matter, but another to usurp one's identity to it with similarities.

I encourage potential artistans to find their own path and explore (with research) their own gift. It's easy.

Now that I've cleared the air, I move on to the next process which will be featured in 'Part Two' of this series. There will be unspeakable details that will alter how future modelbuilders will view this subject...whether it be from a kit such as this, or created from scratch. Whatever the medium, the subject will still 'float' the same. The name will still be the same. The only change will be overlooked details.

It's been a pleasure introducing this vintage kit that was introduced on the market nearly 60 years ago. There are still many unbuilt kits in existence which should be considered 'built' and viewed for enjoyment as they were intended. For this, I raise my glass to the early engineers and draftsmen who designed this model. It is, and was one of the masterpieces of the day and I'm fortunate to be able to bring it back as part of my trilogy to Airfix.

Thanks for viewing!

Wednesday, March 4, 2020

Sailing Ship VASA c.1628 -Modified/ Rex Stewart...Part Three


In this third of a five part series, my focus is on the rear deck and bulkhead detail(s) - followed by the stepping of the masts.

 Because the kit was warped (and there were testimonies from other builders), it was necessary to clamp the hull halves during the early stages of construction so that I could assess how much space was needed to fit decks and bulkheads without causing too much stress on the plastic.

In the above photo the helmsman bulkhead is shown in plastic which will be partially customized
in wood. Much of the decorations will be copied from the Landstrom book. The delicate part of this build will be to shave paper-thin wood doors and have them appear open.


A view of the stern deck bulkhead cabins on the actual ship at the Vasa Museum in Stockholm, Sweden. One flaw that I own up to is my placing the main knighthead portside. In the photo it is clear that it was located starboard. There is no argument here; I concede.

Concerning detail, I transferred what was visible in this photo to my VASA miniature.


This overview of the VASA show the correct deck layout of the ship's furniture (in scale) which include the pinrails and knightheads. The gratings had to be reduced and scaled properly to fit the guns -giving enough room to show the gun carriage run in system when in action.

The wood decking is the highlight which add overall realism...especially with the accent of the coiled ropes which will show freefall from the sails and masts.


Now that decks are finished, I carefully inspect the decoration, gunport and lanyard channels for paint spotting -making sure everything is completely covered. All details must be finished before moving on to the anchors. Usually the build take two days to complete due to the model's miniature scale...but well worth the effort (based on past projects and/or commissions).

The below photo images show the fashion of anchors during the early 17th century on Dutch ships of the period. Since VASA was designed by a Dutch builder, the practice applies to the vessel. I studied contemporary models both here in the States and Europe and was slightly disappointed with my findings which prompted me to return back to Bjorn Landstrom's book for the finer details.

From his book, coupled with my personal research of the Dutch and English Masters (artists), I found his work to be very credible and applied the rigging system accordingly. On either side of the model, the rigging system of these anchors differ. Portside show them stowed and starboard has them fished.


Stowed anchors...portside.


Fished anchors...starboard


Now with anchors completed, the next step of the build are the miniature cannons and boats, followed by the stern lantern and flagstaff.

Armament can be complexed when customizing small scratch-built cannons. Much planning and thought must be weighed -especially when scale is involved. Kits are not designed to be perfect. In fact, kits only present a basic generic of detail -and much of it is not guaranteed to be scaled properly. It's a matter of choice as to the level of detail pursued, but it will cost many hours of research and patience. There are no shortcuts. In the supporting images I begin working on the cannons  -building  them (to scale) accordingly to the ship's deck furniture.

Below are images that reflect the level of  'miniature' I desire to achieve.


As viewed, these cannon miniatures are no longer than two-thirds the width of an American dime (as shown above). The materials used are bass and birchwoods, paper, copper wire and vintage carpet thread for the recoils.


 In this image the cannons are installed. To compliment them, I secure  the shot trays between the guns. In them I simulated cannon balls which can be seen with a magnifier...Below a closeup view of the shot tray.


On many VASA models I noticed the capstan not properly clearing the stowed boats. But what really caught my attention was the absence of the belfry. All ships, especially naval, carried this forward at the bow area of the forecastle.Without this (the belfry) ships would not be functional, especially in battle.


My draft and build of VASA's belfry -using birch for the bell and basswood for the overall structure. A fine sable brush was used to achieve the hairline gold-edged corners and scroll work on the roof facade.


After carefully investigating VASA's forecastle layout, I concluded that the belfry was located between the barrister rail and foremast which void all fouling of cannon tackles and sail rigging as shown in the supporting images.


Stern detail of VASA's deck furniture and cannon. No kit involvement here; all details were scratchbuilt in wood. The next and final approach to finishing the hull will be the inboard boats and ship lantern.


In this three-stage process I use Mr. Landstrom's book to scale (in miniature) the VASA's stern lantern.  Measuring both top and base features, I move the template down to the transom for scaling. From there, I am able to make a template (red half-circle) to assist in the building of an accurate miniature for the model.


The three supporting images show the finished lantern...At least 46 pieces combined in wood, paper, acetate, and metal make up its design. Not only can one see through the simulated glass; but looking closely,  wings can be seen framing the windows from the sculpted uprights.

Fast forwarding, I now address the ship's boat -the longboat that was discovered next to VASA when she was raised in 1961. From Mr. Landstrom's writings it was defined as a sloop that carried leeboards port and starboard. On many models (small or large), I have not seen this item featured; so after many hours of study, I decided to add them to further authenticate the miniature.

The supporting images show the start and finish of the build:


The VASA longboat (sloop) shown as it appear at the museum.


Above, these three images show the build's progress, the rigging of the leeboards, and the final installation of the sloop. Overall, it took approximately three days to build...using pine, bass and birch woods.

Now that this segment has been achieved I will move on to the masts and rigging in the hopes that it will encourage many of you to take on the Airfix Classic Series kit of Wasa c. 1628.

I never snubbed my nose at the fact that the kit was plastic. I studied details and researched products to modify it into being a museum piece. Taking nothing away from it's properties, rather adding to it to prove how exquisite a regular kit such as this can become...with patience.

I appreciate the follow and hope to read your accounts relative to this.

Fair winds!