Showing posts with label tallship. Show all posts

Wednesday, March 24, 2021

Airfix 1:180 Scale PRINCE...The Art Of Modification/Rex Stewart -Part Four


This is a more advanced image of the PRINCE current stage, but it has enough finished detail to now focus on the upper batteries and channel deadeyes.

I realize that this will probably be a seven to eight part blog. However, it's worth writing, especially when serious builders want to further their skills relative to historical detail(s) as opposed to the generic -or common practice.

I can't say it enough about 'admiralty models'..Again, they were not accurate in the sense of scale, but rather beautiful art pieces that were visual prototypes for building the actual ship. Builders get caught up in thinking that these prototypes were, in essence, the 'bible' to naval architecture. They weren't; and to believe that is a misnomer. I was fortunate to learn this (the hard way) years ago when a serious collector 'collectively' corrected me on certain details that I copied from a admiralty model. He waived the advances (out of respect for my work) and had me repeat the build with written data from writings of that period. That model became the cornerstone for all my models -including steamboats.

The images I'm about to place here will stem from actual documentation -and not speculation or theory. This is what makes a model unique and beautiful.

In my last blog I showed how I customized cannon to fit properly in the ports. Here, I show them from various deck angles which give a realistic feel of duplicating the actual ship...This is due, in part, because of proper scaling. Below are four images to support this:


A port broadside overview showing the complete gun batteries in both coil and recoil positions on both the main and quarter decks.


Portside stern overview showing another inboard/outboard perspective of the cannon and grates. On the original model the grating was too close to the mizzen mast and was relocated further ahead to the  quarter deck fore rail area. It was scaled wide enough to make room for the carriage tackles running in and out the cannon.


Starboard profile of main deck artillery...
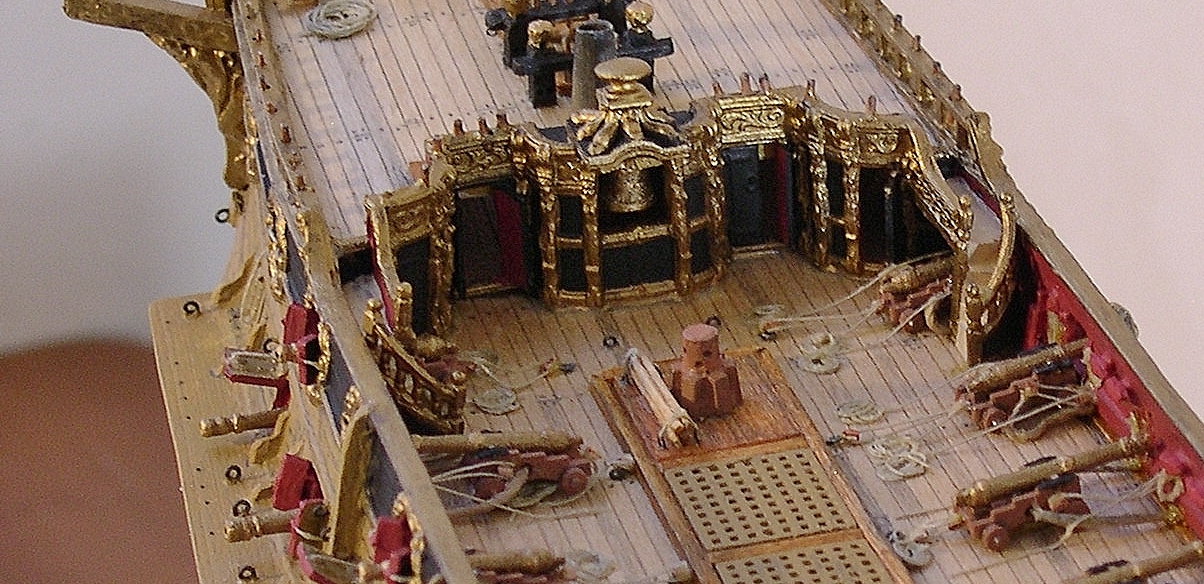
 

Port overview showing the forecastle belfry, companionways and inboard/outboard cannon and tackles. Instead of keeping the full capstan, I removed the upper portion and replaced with a hole-drilled dowel and made wood capstan bars which are shown belayed on deck.


Port stern view showing partial full main and quarter deck cannons. This was the final deck installation before moving on to the channel details. On the admiralty model the belay pins were atop the rails. Unfortunately, because the Airfix version was off scale in this area, I had to compensate by placing the pinrails inside the bulwarks.

Over a hundred or so models I researched on Prince, I noticed details missing that encouraged me to place more emphasis on this. With the channels I noticed eyebolts missing which took the relieving tackles; but this was also evident in the tops. On the main channel the lower studding sail boom and cradle wasn't featured (on any of the models); nor knees attached to both channel and hull to strengthen it (channel) for taking on the heavy boom and relieving tackles. Below, I show this detail in a Willem van de Velde II study of the English ship  VICTORY which was built in 1620...She is shown as she appeared in 1666.


There is another possibility at play here; the fact that this was, and could be, a spar lashed alongside in the event that a topmast was lost at sea due to inclement weather or sea battle. There is another spar at the quarter deck tier which is lashed as well. However, in the Kennington lists of the 1650s, studding booms were mentioned for the main mast and must be presumed to fit on the main channel.

For a model builder, it's a judgement call. For me, I chose to feature this detail as an additive to European maritime practice as shown in the photo image below.


Another portside overview showing the studding boom and cradle on the left at the deadeyes and  channel...


Research is what you make it; it can be intense or it can be mediocre...but at the end of the day you own it. This is why I try to make the best of my materials and look further into documents to find whether things are 'political' or whether absolute. In my journey I've danced with both and I found this great peace of knowing truth -which is why these pieces are at the level that they are.

Now that I've clarified the studding booms, my next process of the build are the masts.

To join plastic to wood is a tricky endeavor. The right glue is needed and a ton of patience. Since I will be using the plastic tops, caps, and crosstrees; it's essential that I carve the wood masts a millimeter smaller than the actual (plastic) masts so that these can be fitted properly in the routed cavities where the plastic was. To keep the wood in those cavities I carefully drill holes in both plastic and wood pieces -gluing a metal pin in the wood and then sliding the open air part of the pin into the plastic. Being careful not to have glue touch the exposed areas since these have to be stained, varnished and painted.

Below, I shave away excess wood to form the mast...


Notice the partially finished mast above my carving hand; and notice the completed mast below. To actually view it, one would be convinced that it was totally wood.


The next step of the build is to study all the belay systems before stepping the masts. This is very important, because once the masts are secured, there's no possibility of having all the lines rigged. This can take several weeks...sometimes a few months; and serious builders/collectors know this.

Below are several views showing the masts, and how they will appear on the model before the rigging is started.


This concludes the fourth part of the HMS Prince build. I truly hope that what I've stated can be beneficial to those who currently own the Airfix kit. Understand that no kit is a hundred percent intact by way of fitting together parts. Every kit has its pitfall, no matter how detailed.

What will guarantee a nice model will be the patience in building it. There will be moments of anxiety and frustration; but that comes with the territory of discovering new information and/or techniques. Quality depends on how much time one is willing to put in a project...but, NEVER get consumed. That will only drain your focus. The 'first' PRINCE drained my focus, as the model was attractive; but, common mistakes were made. However, I corrected those flaws and am satisfied with this current work. 

That being said, I close this portion to make way for the next.

Fairwinds!

Monday, December 23, 2019

Sailing Ship VASA c.1628 -Modified /Rex Stewart


Here, we have the complete modified beakhead and stem of the Royal Warship VASA -based on Bjorn Landstrom's research and illustrations at the time the ship was raised from Stockholm's harbor in 1961. The book, itself, was published in 1988...being an invaluable asset to my build in spite of the criticism from various contemporaries.

In this second part series I focus on the beakhead and deck applications... Again,  museum quality model(s) can be achieved from the Airfix kit; but it takes an enormous amount of patience and concentration to bring the build to this level seen in the blog. Furthermore, it takes effective engineering and proper knowledge of Dutch rigging to make this a worthy endeavor.

There are no shortcuts...


The grated flooring of the Airfix kit was rather basic with limited detail. There were no openings for the gammoning or tack leads. So to compensate, I traced the kit version unto basswood -cutting out the outer frame and gluing small miniature slats across to serve as gratings. It was tedious and time-consuming; yet very gratifying after two attempts.


The grated flooring finished and installed...


After the beak's flooring was painted, I went to work on the forecastle bulkhead -modifying the entranceways and replacing the plastic doors with wooden ones (as seen below). But before that was accomplished I scaled down the Swedish Coat of Arms that was featured on main deck rail system (as seen above). This small detail would be the highlight of the bow.


In this image the viewer is shown modified doors, hull stem for sprit mast, and companionway steps.

All information provided by historians is based on the limitation of information. Meaning, we work at what level of truth is evident for the period researched. There are no absolutes, only findings that are probable and concise...And yes, mistakes can be made with research; and a real historian will puth the facts put there and not allow politics to corrupt and/or pollute it. I follow blueprints (and even produce my own) which stem from the blueprints established by others.

Bjorn Landstrom book is a landmark study of the VASA; yet, in some areas he flawed. However, in most areas he shined and that's where many miss the mark.

The next three images will show the completed beakhead and the frontal piece of the forecastle...with some additional details such as the small ladders leading down to the grated flooring from the port and starboard doors.


Closeup detail of VASA figurehead in goldleaf...


Port beakhead overview...


Bow starboard frontal view...

The next step of the build/modification are the decks. These must be carefully planned in both layout and fitting. Also the right scale for the grating, knight, bitt and bulkhead locations are very important for the overall appearance. Furthermore, the rigging has to be considered relative to spacing on the deck and pinrails. There must also be room for cannon to be run in and out by the tackles, so the grating must be scaled to compensate this.

The below image show the new reconstructed deck in comparison to the kit's feature.


Proceeding further into the build, I arrived at this stage of the deck layout


Subtle starboard view of deck looking forward...Notice the 'sweep' as was typical of the Baltic State ships of the period.


As I build my eyes are continuously searching the model from stem to stern. I try not to remain in one area too long, as this will cause neglect and missed detail to other locations. Sometimes my best corrections are when I apply this process.

Working with guns command ongoing attention because it is the main feature to any fighting ship. I could never understand a model with all cannon run out on either or both sides. It doesn't seem realistic -or authentic. In this build I place the gunports in various stages, re: closed, partially closed, partially open, completely open...Along with the flags and sails, this is another one of my signatures that distinguish me from my contemporaries. Below, a waterline image that show the varied gun stages on VASA.


Below, a profile view of the opened gunport variations...Notice on the ports and hull how realistic these features appear (under diffused lighting).


Sixteenth and seventeenth century ships has to be some of the most beautiful  vessels to model...and I've done both. However, my line of work is extensive which cover ships and vessels of all periods. But these two centuries are special because it allow me to go all out with my carving and sculpting skills...Furthermore, I can appreciate the intricate workmanship of those artists and shipwrights who illustrated, designed and carried forth the artistic mastery of that time upon their vessels.

That being said, I now present the last two images of VASA's stern galleries to close out 'part two' of the series.

There is more to address within the ship's interior before stepping the masts. I can only hope the seasoned builders will make good on their 'stash' as they call it and not let those kits sit idle. And of the collector(s), I encourage you to acquire these as they are valuable when modified. The detail is 'there'; it's a matter of choice to how much correction in the detail is preferred...because beauty is in the eye of the beholder.


These last two views show the completed stern galleries of VASA...It is believed that her topsides were red, but there were no evidence of that based upon Bjorn's writings on the subject. What little evidence he wrote about claimed that there were traces of blue pigmentation and gilding. Of colors, some pigmentation were found inboard around the bulkhead doors and interior walls of the cabins. Climatic conditions, sealife and water corrosion took its toll on the vessel...so much of the color had to be derived from master painters of the period. And even in that, not one painting in any museum show red topsides.

With that in mind, I now close this segment of the build and raise my glass (honorably) to Bjorn Landstrom's legacy. This will be a fine study and a most memorable model when finished.

To view my credentials and other fine work(s) please visit https://www.linkedin.com/in/rexstewart and https://youtube.com/c/RexStewartoriginals.

For information concerning commissioned work call 1-774-757-7137 or write for details at: Caseships@yahoo.com.

Thank you for viewing!