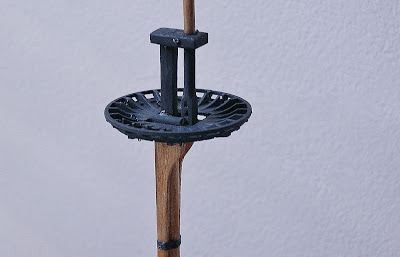
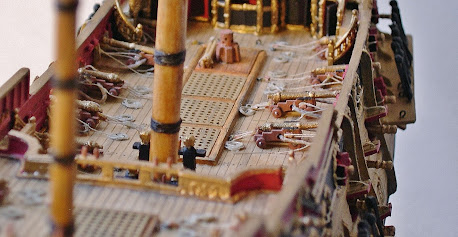
This is a more advanced image of the PRINCE current stage, but it has enough finished detail to now focus on the upper batteries and channel deadeyes.
This site deals primarily with miniatures relative to the ship model -whether scratch or kit modified. Many of these works are scratchbuilt; but those that are modified are true to their presentation and exceed traditional values....For over 40 years maritime artist and craftsman Rex Stewart has built fine models in this genre -both sail and steam. In recent times (15 years), the miniatures has been the focal point of honorable research and collected worldwide.
Wednesday, March 24, 2021
Airfix 1:180 Scale PRINCE...The Art Of Modification/Rex Stewart -Part Four
This is a more advanced image of the PRINCE current stage, but it has enough finished detail to now focus on the upper batteries and channel deadeyes.
Wednesday, March 3, 2021
H.M.S. PRINCE -The Airfix Modification...Part Three/ Rex Stewart
This third series addresses deck layout, rigging and belay points. There is much to say on this subject, but from this above image, I need to say very little. In short, the information is out there...and can be very beneficial -provided time is taken to find it.
Many Prince models I've seen were rushed to ruin because the builder took on the persona of 'oh well' after realizing errors. This is why I'm adamant about careful study and what I research. If quality is the objective, then persistence and patience must be practiced at 'your' pace. It's 'your' model and 'your' perception on how 'you' want it to be. Whether mediocre or fine, the decision is 'yours'...and you must be happy with it.
During the 1980s and '90s many builders were in competition with one another to grab that 'spotlight' -especially in the arena of sailing ships. As a result, there was mass confusion about ships, their design, rigging methods, etc., etc. Even galleries climbed aboard to promote their 'superstars' until I arrived.
To that end, I faced opposition from all sides, but weathered those storms of vanity to be persistent in my chosen livelihood -with extended support from real experts whom provided me the jewels of their findings. I discovered a page of history unfolding because many were women.
This third series will not be about technique(s), rather about the process as to how I came about my findings -starting with the first images below:
As a rule of thumb I build my models by correctly scaling them; and making changes to kits that don't accurately have the pieces in sync with the build. This is done by drawing a figure to match the model's scale and the supporting items. Most of the time I find that I must discard these items and replace them with custom pieces to match what's on the template. By doing this early, the rigging process becomes less taxing.
The three principle areas of focus I consider for a build such as this are doors, stairwells, and railings. If these elements conform to scale, then everything else will fit accordingly. This closeup view show the doors, stairwell and railing system which I modified to give the appearance of a real ship. There's yet much to do...
Another closeup showing the quarter and poop deck stairs and bulkheads. The plastic windows were removed and replaced with acetate. The doors were tedious by way of removing; these were adjusted in open position with shaved basswood. I find that doors fully and partially open tend to be more attractive -bringing the viewer to it.
Port overview showing the progress of the main and quarter decks. In the Airfix kit limited grating was featured, so I improvised and made the grates for every deck except the poop -or roundhouse deck. I noticed this to be true for other kits on this subject; but the reality was that ships needed these grates to have ventilation -especially when engaging the enemy. The smoke needed a place to escape and the gratings were created for that purpose. Unfortunately, many modelers miss this...or choose not to place them effectively.
This overview show the complete deck and grating system for PRINCE.
Another flaw are admiralty type models which are used for a project's absolute...They are not 'absolutes' -they are study models.There must be an understanding what is meant by an admiralty model from this period. Like any ship model of this era, these were prototypes created to present the Admiralty a three dimensional schematic of what the ship might look like. It was not the conclusion, as features were added and/or dismissed during the actual build. Furthermore, rigging was at the discretion of the captain and/or ranking officer, so even in that area nothing was yet conclusive until the vessel went to its sea trials. This is where I encourage modelers to seriously study the basic rigging practices of the period and incorporate it before presenting the word 'museum quality'.
This is not a play on words; serious modelmakers know this.
Below is one of my notable woodsculpted dioramas that I created in the 1990s depicting "The Admiralty c.1660". Here, the Admiralty members are viewing a vessel prototype before it's voted upon for construction. Since that time I only produced two of these which were immediately bought -and since I'm working on PRINCE, I will probably produce my third and last diorama to honor the Airfix Trilogy.
The next views of the build highlight the detail to the forecastle. I studied many PRINCE models to make a fair assessment of the ship. Applying what I studied and researched, this is my conclusion. I noticed that there were no bitts shown at the foremast base. It's obvious that these were there based on paintings and drawings showing rigging leading down to that area. Furthermore, the conclusion of the matter lies with Vasa that was raised in 1961 and the restoration of both USS Constitution and England's HMS VICTORY.
Bitts lightened the stress of the massive yards and sails -which occasionally had tackles to assist. However, the bitts and knightheads (part of the bitts system) had to be reinforced by way of the deck and not the rail. Again, the admiralty model did not serve its purpose here because I strongly believe it was only emphasizing possibilities. But based on the evidence of Constitution, Vasa, and Victory this feature was essential.
Airfix Prince model looking forward showing enhanced detailing of the forecastle. The belfry was solid which was customized to include the brass bell. Both cabin doors are open so it can afford the viewer observance of the open ports and cannon. On the forecastle deck behind the belfry are the bitts and galley stack.
Another angle from starboard...
And finally, a starboard profile...
This concludes the decking process on a much heralded kit from Airfix. What makes this kit worthy of build are the many variations one can do with it. Even if I were to build another, it would look entirely different from this; albeit probably one without sails.
The guns and boats are now the next step before addressing the masts. Below, are images of how miniature (and detailed) this will be. One gun alone with full tackle take about two to three hours; but, well worth the investment for achieving a quality model.
It's been a pleasure featuring this build up to this stage -and I hope the next blog will go further in depth regarding the tackle systems, rigging and other details that may have been overlooked in previous Prince models.
Thanks for viewing!


