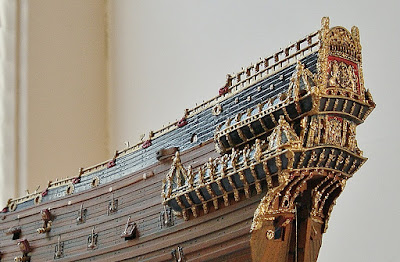
Here, we have the complete modified beakhead and stem of the Royal Warship VASA -based on Bjorn Landstrom's research and illustrations at the time the ship was raised from Stockholm's harbor in 1961. The book, itself, was published in 1988...being an invaluable asset to my build in spite of the criticism from various contemporaries.
In this second part series I focus on the beakhead and deck applications... Again, museum quality model(s) can be achieved from the Airfix kit; but it takes an enormous amount of patience and concentration to bring the build to this level seen in the blog. Furthermore, it takes effective engineering and proper knowledge of Dutch rigging to make this a worthy endeavor.
There are no shortcuts...
The grated flooring of the Airfix kit was rather basic with limited detail. There were no openings for the gammoning or tack leads. So to compensate, I traced the kit version unto basswood -cutting out the outer frame and gluing small miniature slats across to serve as gratings. It was tedious and time-consuming; yet very gratifying after two attempts.
The grated flooring finished and installed...
After the beak's flooring was painted, I went to work on the forecastle bulkhead -modifying the entranceways and replacing the plastic doors with wooden ones (as seen below). But before that was accomplished I scaled down the Swedish Coat of Arms that was featured on main deck rail system (as seen above). This small detail would be the highlight of the bow.
In this image the viewer is shown modified doors, hull stem for sprit mast, and companionway steps.
All information provided by historians is based on the limitation of information. Meaning, we work at what level of truth is evident for the period researched. There are no absolutes, only findings that are probable and concise...And yes, mistakes can be made with research; and a real historian will puth the facts put there and not allow politics to corrupt and/or pollute it. I follow blueprints (and even produce my own) which stem from the blueprints established by others.
Bjorn Landstrom book is a landmark study of the VASA; yet, in some areas he flawed. However, in most areas he shined and that's where many miss the mark.
The next three images will show the completed beakhead and the frontal piece of the forecastle...with some additional details such as the small ladders leading down to the grated flooring from the port and starboard doors.
Closeup detail of VASA figurehead in goldleaf...
Port beakhead overview...
Bow starboard frontal view...
The next step of the build/modification are the decks. These must be carefully planned in both layout and fitting. Also the right scale for the grating, knight, bitt and bulkhead locations are very important for the overall appearance. Furthermore, the rigging has to be considered relative to spacing on the deck and pinrails. There must also be room for cannon to be run in and out by the tackles, so the grating must be scaled to compensate this.
The below image show the new reconstructed deck in comparison to the kit's feature.
Proceeding further into the build, I arrived at this stage of the deck layout
Subtle starboard view of deck looking forward...Notice the 'sweep' as was typical of the Baltic State ships of the period.
As I build my eyes are continuously searching the model from stem to stern. I try not to remain in one area too long, as this will cause neglect and missed detail to other locations. Sometimes my best corrections are when I apply this process.
Working with guns command ongoing attention because it is the main feature to any fighting ship. I could never understand a model with all cannon run out on either or both sides. It doesn't seem realistic -or authentic. In this build I place the gunports in various stages, re: closed, partially closed, partially open, completely open...Along with the flags and sails, this is another one of my signatures that distinguish me from my contemporaries. Below, a waterline image that show the varied gun stages on VASA.
Below, a profile view of the opened gunport variations...Notice on the ports and hull how realistic these features appear (under diffused lighting).
That being said, I now present the last two images of VASA's stern galleries to close out 'part two' of the series.
There is more to address within the ship's interior before stepping the masts. I can only hope the seasoned builders will make good on their 'stash' as they call it and not let those kits sit idle. And of the collector(s), I encourage you to acquire these as they are valuable when modified. The detail is 'there'; it's a matter of choice to how much correction in the detail is preferred...because beauty is in the eye of the beholder.
These last two views show the completed stern galleries of VASA...It is believed that her topsides were red, but there were no evidence of that based upon Bjorn's writings on the subject. What little evidence he wrote about claimed that there were traces of blue pigmentation and gilding. Of colors, some pigmentation were found inboard around the bulkhead doors and interior walls of the cabins. Climatic conditions, sealife and water corrosion took its toll on the vessel...so much of the color had to be derived from master painters of the period. And even in that, not one painting in any museum show red topsides.
With that in mind, I now close this segment of the build and raise my glass (honorably) to Bjorn Landstrom's legacy. This will be a fine study and a most memorable model when finished.
To view my credentials and other fine work(s) please visit https://www.linkedin.com/in/rexstewart and https://youtube.com/c/RexStewartoriginals.
For information concerning commissioned work call 1-774-757-7137 or write for details at: Caseships@yahoo.com.
Thank you for viewing!


